
To most entry level DIY mechanics, the standard disc brake job is always on the top of the list for common first wrenching endeavors. Whether it be because of loud noises when coming to a stop or applying brakes in reverse, or that pulsating horrible vibration when slowing down from speed, there’s always a tipping point that gets a car on jack stands in the garage of a newbie. Here are some tips that are often over looked, because having to do a brake job twice is never an enjoyable experience. For these purposes, I am going to discuss a full brake job with pads and rotors. YES, this is a long read, but trust me, if you skip these steps you will hate yourself in 6 months. It’s not as straight forward as you may think, so grab a cup, sit down, and absorb the information you will need to have a lifetime of smooth brakes.
The most common reason for the at-home mechanic to do any task is to save money, that’s a given. However, when you are dealing with the safety and comfort of your vehicle for the next 30-60k miles, it’s important to make a few initial investments. You will thank me when you do, because I am sure you have a long, fruitful history of brake maintenance in your future. Do not skip steps! Especially #18, we will not be responsible to take back brake parts that were improperly bed-in.
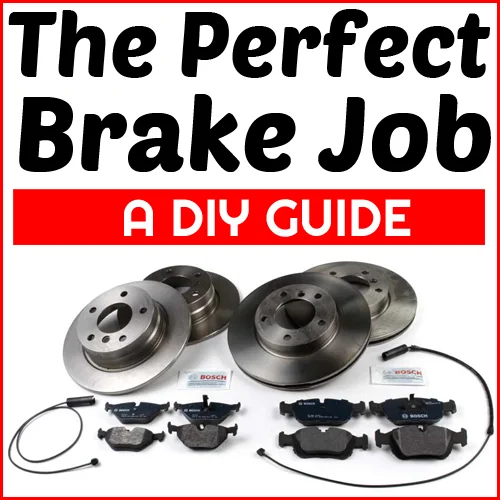
Things you will need
A Shop Manual for your car for torque specs, and to avoid hangups on proprietary or strange designs
A solid ratchet/socket wrench kit (doubling up with shorty and deep sockets often comes in handy due to the tight spaces you are working in)
A comprehensive selection of open ended wrenches. A ratcheting set will make your life easier, but are often not possible to use due to space.
A small selection of screw drivers
A rail with Allen head sockets
A rail with Torx sockets
A bungee cord, some wire, a coat hanger, or something similar to hang the caliper
Some penetrating oil, like Rost Off or PB Blaster
Loctite thread sealant
Brake Grease (Usually supplied with the pads)
Accurate torque wrench with a long handle capable of 100ft/lbs of torque
Something to compress the caliper to allow new pads to fit in. Sometimes a C-Clamp works just fine, I use a pair of huge slip/joint pliers.
A plastic dead-blow hammer. This is to help remove the wheel from your hub if it’s rusted on without damaging it. Otherwise you can spend hours shaking, kicking, and cursing.
A set of wire or abrasive rotary pads that you can attach to a drill. This will be to clean the wheel hub and rim. Rotary tools are better than using hand sandpaper because they allow for a far more even sanding. If you have wheel studs, you can get special bits that have an open space in the center, so that you can clean around the studs easily.
Optional:
A long handled breaker bar/cheater bar.
Hub run-out gauge. All brake disc rotors are manufactured to a certain tolerance, which is generally under .004″ or four thousandths of an inch. This measurement is the difference between the highest and lowest point on the brake rotor hat. The run-out gauge will let you deduce where the highest point and lowest point is, and install the rotor in the position that will give you the smoothest possible balance. Without it, you run the risk of stacking the high point on the hub with the high point on the rotor, contributing to uneven pad bed-in and faster rotor warping. This is one of the most overlooked steps.
I included a TLDNR version at the bottom for people that are just looking for a refresher.
1. With the car on the ground, ‘Break’ the wheel lug nuts so they will loosen when the car is in the air.
2. Pop the hood and open the brake fluid reservoir cap (or else you won’t be able to compress the brake caliper).
3. Jack the car up and support it on a jack stand. Leave the jack under the jack point for a redundant safety measure. Remove the wheel and put it under the door sill, just as a third safety measure. If the wheel wont come off, hit the back of the rim with the dead blow hammer with some strong armed thwacks, rotating the wheel so you are hitting it in a different spot every time. Be careful not to hit the wheel weights.
4. With the wheel off, you can get a good bead on your next plan of attack. Before doing anything, it’s a good idea to hit all the bolts you will be removing with some penetrating oil. This is especially true if the rotor has set screws, as they are easy to round. If it’s a front caliper, you can identify the guide pins that the caliper slides on. If there is an anti-rattle spring, remove it before pulling out the caliper guide/slide pins. If it is a rear brake with an e-brake or parking brake mechanism, depending on the car you will have to disconnect and back it out. Nearly every car is different, research the mechanism on your specific car before starting.
5. Remove the spring, slide pin dust caps, and remove the slide pins. Unplug any wear sensors if your car has them. The slider pins are usually under the rubber dust caps and are typically allen/hex bit.

6. Pull the caliper off the disk, take the front pad out and make sure you purchased the correct components before continuing. Compress the caliper using the old rear pad attached to the piston/pistons. This is why you need to open the reservoir, as brake fluid will be rushing back into it after compressing it out of the caliper. If you don’t open the cap, you will be stressing the seals out, and have trouble compressing the caliper.
7. Hang the caliper out of the way to avoid damaging the brake line.
8. Remove the caliper carrier by way of two large bolts connecting it to the wheel spindle/steering knuckle. Once off, you can easily clean it up with a wire brush or rotary wheel if you have one. It’s not necessary but usually a good idea. You can also clean the threads of the bolts at this time.

9. Hold your breath and remove the brake rotor set screw. If you are luckily, it will come out with a little force. If it rounds, you can use an angle grinder or similar rotary tool to cut a slot in the screw. It’s OK to also cut into the rotor when doing this since you are throwing it out anyway.
10. The rotor will need some persuasion by means of hammer to remove from the hub. Hit the rotor from the back and the front to loosen it, but don’t hit it so hard as to accidentally damage the hub/wheel bearing.
11. With the rotor off, you can use your wire brush to clean the hub to a nice shine. This way, there is no rust or debris causing unnecessary hub runout.
12. Put the new rotor on and install the set screw, it’s a good idea to wear gloves when doing this to avoid getting dirt or grease on the rotor surface. If you try to bed in a greasy rotor, you will ruin your fresh brake job.
About ‘defective rotors’ – Rotors are tested using a run-out gauge. Use the wheel bolts to bolt it down as if it were tightened with a wheel over it. This is to ensure the best reading for the hub run-out gauge. Install the hub run-out gauge to a solid point on the spindle and zero it out. Here is a good tutorial on how to use a hub run-out gauge [click here]. You can try to rotate the disc on the hub to all 5 possible orientations (4 if you have a 4 lug car) to get the smallest amount of hub run-out, this is to avoid stacking the high points on the hub and on the disc. If the gauge exceeds the manufacturer’s run-out specification in all possible orientations, return the disc, as it is defective. This is rare, but does happen. Before doing that, try the same procedure with the other disc you have for the other side of the car. If that one also falls out of spec, your hub may be at fault and not the brake discs.
You are now ready to re-install your brake components
13. Before installing any bolts, look up the proper torque specs for your particular car, because they can vary greatly. German spec ‘Gutentight’ is not a good idea for use on brake components.
14. Put a small amount of Loctite on the large carrier/caliper mounting bolts and install the carrier bracket onto the spindle.
15. Put a small amount of grease on the backing plates of the brake pads. With modern shims it is less important to do so, but it is still good practice and can make installation easier. Load the brake pads into the caliper, or the carrier depending on design, and install the caliper on to the carrier. Clean the guide pins up so they are nice and smooth, and apply the grease to keep them lubricated. Install the guide pins into the caliper. If the caliper has an anti-rattle spring, install it now.

You are now ready to bleed your brakes
16. It is important to change your brake fluid every 30-60k miles, so it is good practice to do this along with your brakes since they have a similar maintenance schedule. Your brake fluid absorbs moisture, which will destroy your brake system from the inside out. Doing this now will drastically improve the life of your entire brake system (including expensive ABS and TCS components) so pull up your sleeves and get it done. Always use fresh brake fluid from an unopened container, because when it’s exposed to air, it will suck out moisture as fast as it can. Treat the brake fluid as if it were fruit juice from your local supermarket. If the cap doesn’t snap open, dispose of it. Also, DO NOT DRINK (duh).
17. After your lines have been properly bled with brand new brake fluid, clean up your wheel hub and install onto the car, using an alternating star pattern, and a torque wrench. Repeat on the other wheels and don’t forget to put the brake reservoir cap back on.
18. Bed in your brakes by going easy on them for the first thousand miles. Brake smoothly and most importantly, don’t let the new pads sit on a hot rotor. If you emergency brake to a stop light, do not hold down on the brakes. Doing so will result in a shadow of material left on the surface, which will gather more material and become a high spot. Then your brand new brakes will be warped. You do not want this.

A little bit more involved than you thought huh? It’s true that there are a lot of steps you can skip here, but cutting corners will just have you under your car sooner for the next time. Here’s the TLDNR (too long, did not read) check list if you have done brake jobs before and want to breeze through a refresher.
————————-TLDR——————————-
1. Break the lugs, pop the hood, open the brake fluid reservoir
2. Remove the wheel
3. Remove anti-rattle spring (if any), back out the parking brake (if any)
4. Remove the guide pins off the caliper, unplug brake pad wear sensors (if any)
5. Remove the caliper and hang it out of the way, remove the pads
6. Remove and clean the carrier
7. Remove the set screw (if any) and remove the rotor
8. Clean the hub
9. Install rotor with wheel bolts, tighten them down, use a gauge to check rotor run-out. Rotate rotor on hub until the best result is achieved (closest to zero)
10. Install the caliper carrier
11. Grease the backing plates on the pads, clean and grease the caliper slide pins
12. Install the caliper onto the caliper and tighten down the guide pins
13. Bleed the brakes
14. Clean the wheel hub and install the wheel
15. Don’t forget to put the brake reservoir cap back on when finished.
16. Bed-in the brakes properly


You missed a few things.
You need a floor jack, four jackstands, a Motive Products Power Bleeder, either three feet of 5/32″ clear hose and a pint bottle or a Motive Products Catch Bottle, a new turkey baster, a box-end wrench and socket that fit your bleeder screws, and four new bleeder screws. You may also need an electric impact wrench, a set of easy-outs, a drill and some metric taps, and a caliper rebuild kit or four. (Pray you don’t!)
Brake fluid: ALL European cars need DOT 4 brake fluid.
Begin by putting the new turkey baster in the drawer in the kitchen and taking the old one for your brake job. You’ll have to throw it away after this, so why waste the new one?
First, loosen the lug nuts or lug bolts and jack all four corners of your car up. Take the wheels off.
Before you do anything else, make sure you can get the bleeder screws out! They’re on the back side of the caliper, they’re made of very soft metal, and it’s easy to shear off the heads while you’re trying to remove them to bleed the brakes. They get crudded up easy which keeps you from bleeding the brakes properly, and they’re not expensive so live it up and get new ones. Soak them down with penetrating oil and use your box-end wrench (or your socket, if you can get it in there) to try to open them. If they open, screw them back in and go on to the next step.
Now install all the new hardware.
Here’s the fun part. Change all four bleeder screws and tighten them. Use the old turkey baster to suck all the old brake fluid out of the reservoir. Fill the reservoir with new fluid and hook up the power bleeder. Pour the rest of the quart of fluid into the power bleeder reservoir and put the pump cap on. Pump it up to 15 psi – there’s a gauge on the side. Go to the left rear wheel. Connect the clear hose to the bleeder screw and open the screw. Let the fluid run NOT until bubbles stop coming out, but until the fluid is the same color as it was in the bottle. Tighten the bleeder screw and move to the right front wheel, its partner on the brake circuit. (All cars have two brake circuits: left front and right rear, right front and left rear.) Pump the bleeder back up to 15 psi and flush the right front wheel. Pump the bleeder back up and flush the right rear, then pump it back up and flush the left front. If you have a manual transmission with a hydraulic clutch pedal in your car, bleed the clutch too because it’s running off the same supply of fluid. (If you want to go around the car one more time and rebleed all four calipers and the clutch if you have one to be sure the brake system is completely air-free, that would be fine.) Tighten all four bleeder screws a quarter-turn, clean up any spilled brake fluid, and put the wheels back on. Once the car has been lowered to the ground, release the pressure in the power bleeder and disconnect it.
Thanks for the brake bleeding tutorial, the power bleeder is a great thing to have if you don’t have someone around to pump the brakes for you. It is important to replace your brake fluid every few years to keep absorbed water from rotting out your entire brake system from the inside. Why do you think old cars always have brake issues? It’s because people never change their brake fluid!
You make a great point about putting the brake reservoir cap back on. I need to get an auto service to inspect my car. I think I have faulty brakes.