

VW Jetta was, and still is, one of the most famous German econoboxes in the US. It’s a rare VW model where the mighty TDI wasn’t only an option but also a logical choice. The torquey TDI offered an impressive mileage, plenty of low-end pull, and rather interesting emissions results. That low-end torque has its downsides, as rare as they are. One of them is the potential premature engine mount wear. VW Jetta motor mount replacement isn’t a difficult job, but it does require a few tools, a bit of patience, and a healthy DIY spirit.
How to Diagnose a Faulty Engine Mount
Failed or failing engine mounts are fairly easy to diagnose. In fact, it’s only when they fail that you realize just how important of a job they’re performing.
An engine mount’s job is to hold the engine in place and soak up any vibrations that the engine is producing. No matter what kind of motor mount you have in your car — standard bushing, hydraulic or active mount — most of them produce similar symptoms as they fail.
You’ll mostly notice what appears to be a linear increase in vibrations emanating from the engine bay. Depending on which mount goes first, you’ll also see an increase in motor movement.
Severe cases of the motor or transmission mount failure can cause loud clinking noises. These result from the engine moving all over the place under torque when you give it gas. Naturally, a failed engine mount isn’t something you want to ignore.
Replacing an Engine Mount on an Mk V/Mk VI Volkswagen Jetta
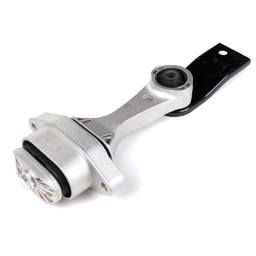
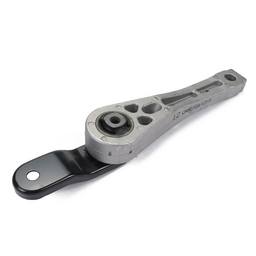
The beauty of driving a Volkswagen is that this German giant loves to use identical parts across various vehicles. As a result, you’ll find that most Mk V and Mk IV Gold/Jetta platform cars share the same motor mounts as our 2011 Sportwagen TDI here. That being said, you should prepare for a potentially tedious task ahead.
Replacing the engine mount will require a few tools:
- 18 mm socket
- 16 mm socket
- 10 mm socket
- A socket extension
- Socket wrench
- Universal joint
- M10 triple square socket
- Torx T27 bit
- Floor jack
- Woodblocks
You’ll also need one new motor mount. With the list of parts and tools laid out, let’s start with the replacement.
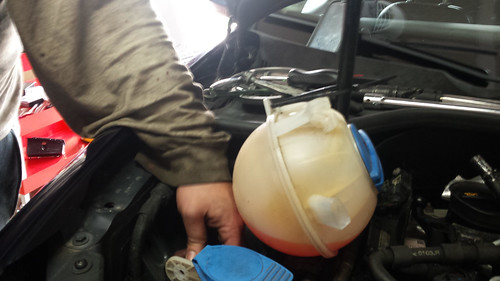
Step 1 – Remove the Coolant Expansion Tank
Removing the motor mount itself is pretty straightforward, but reaching it isn’t. To get anywhere near it, you’ll first need to remove the coolant expansion tank. It is held in place by 3 Torx screws that are easily removed.
To make more room, disconnect the overflow return line as it allows you to move the expansion tank more easily. Next up, you’ll need to remove the washer reservoir fill neck. It’s held in place by a bracket. To remove the bracket, you’ll need to remove the 10 mm nut that’s holding it down.
Step 2 – Remove the Fuel Filter Housing Bolts
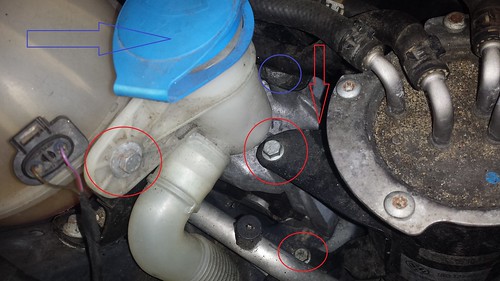
With the expansion tank out of the way, you catch a glimpse of the motor mount sitting right behind the fuel filter housing. The only issue now is that you can’t really reach the bolts to remove the mount.
To do so, you’ll have to remove the bolts that hold the fuel filter housing in place. These are also 10 mm bolts. Consult the picture below to see the location of all relevant 10 mm bolts.
Once the fuel filter housing is out of the way, you’ll have to get the fuel lines out of the way as well. Fortunately, they are all grouped up and held in place on a tray. All you have to do is take your M10 triple square socket and undo 3 M10 bolts that hold it in place to remove the tray.
Once these are out of the way, the only thing left to remove is a bracket the washer fluid filler sits in. This bracket goes from the motor mount to the fender and needs to be removed to get to the mount. Take your 16 mm socket and remove the single bolt that is holding it in place.
Step 3 – Jack the Engine
At this point, you can clearly see the motor mount on your Volkswagen Jetta. However, before you undo either of the two bolts holding it down, you need to jack the engine up. You can either use a motor crane if you got one, or you can use a floor jack and a pair of wood blocks to jack the engine off the ground.
Step 4 – Replace the Mount
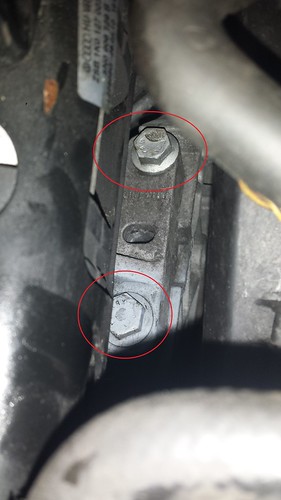
With the motor jacked and secure, start removing the two bolts that are connecting the mount to the engine and two that are connecting the mount to the fender, in that order. Make sure that the engine is jacked up properly.
You’ll know if everything is snuff when you start loosening the second bolt on the engine side. If the engine starts to drop too much, you need to stop and adjust the floor jack. With all the bolts out, remove the old mount and insert the new one carefully.
Reinsert all of the bolts and start tightening them in a pattern. Follow the torque specs and tighten the engine side bolts to 44 lb-ft and fender side bolts to 30 ft-lb of torque.
Step 5 – Reassemble Everything
At this point, all you need to do is put everything back the way it was in the reverse order. To avoid any confusion when reassembling everything, make sure to take a few photos of bolts and parts as you remove them from the vehicle.
Only Buy Quality Volkswagen Engine Mounts
Your Jetta deserves all the TLC you can give it. That means following a strict maintenance cycle, respecting oil change intervals, and using only quality parts. Engine mounts are considered a critical engine component. We recommend running only OEM or Genuine VW replacement mounts.
To find what’s available for your particular make and model, head over to our online store and input your car’s data into our navigation menu. You’ll be presented with many quality options.

