
Paintwork represents the final layer of protection of a vehicle. Its job is to prevent the environmental factors from reaching down to the bare metal that makes the body of your car, and structurally compromising it through corrosion. That being said, paintwork also has a massive aesthetic value, which will be the topic of our guide today. Paint correction is the process of removing physical damage from the top layer of your paint, filling in any paint chips, and refinishing the entire surface of the car.
All of this greatly improves the appearance of the vehicle you’re working on, while also ensuring that every part of the bodywork is protected from the elements. That’s the paint correction in a nutshell. To get the full picture, we have to dig deeper in this installment of eEuroparts.com Car Owners’ Manual — Intro to Basic Car Maintenance.

What Is Paint Correction?
The explanation above does a good job of providing a basic understanding of what paint correction is. However, it fails to shed light on the scope of this entire process, and all of the secondary processes that are involved. Before we get to those, we have to touch upon the reason for paint correction.
The moment your car rolls off the production line, it has to deal with UV rays, dust particle abrasion, tiny rocks, bird droppings, tree sap, and a number of other things that are generally bad for the paint. While some people take great care to protect their cars by washing them regularly, and by parking them away from all these potentially damaging factors, most don’t.
Most people don’t care about UV damage, or scratches, or the acidic nature of bird droppings. Compounded over a span of several years to a decade, these things tend to greatly deteriorate the clear coat, which changes the way your car’s paint reflects light. This is the reason why scratched-up cars, or cars that have an oxidized clear coat tend to look matte and generally dull.
With all that said, paint correction is often done to brand-new vehicles. It isn’t unheard of to drive a new car out of the dealership showroom, only to find that it’s literally covered in swirls and scratches. Or, that its factory paint includes a lot of “orange peel” and other paint defects.
Paint correction is also the main part of full auto detailing, which you can read about in the previous chapter of this guide.
How Does Paint Correction Work?

To remove the dullness from your paint, you have to even it out. In other words, you need to either fill in the damage in a clear coat or paintwork or remove a layer of clear coat until any groves, scratches, or etching is gone. Either way, you want the light hitting a flat surface, and reflecting at 90°.
This is what we call the accuracy of reflection. The latter the surface, the more accurate the reflection will be. When you introduce scratches and etchings, the light no longer reflects at a perfect angle. Instead, it’s now reflecting all over the place, which is why your car may no longer have that showroom shine.
Types of Paint System Damage
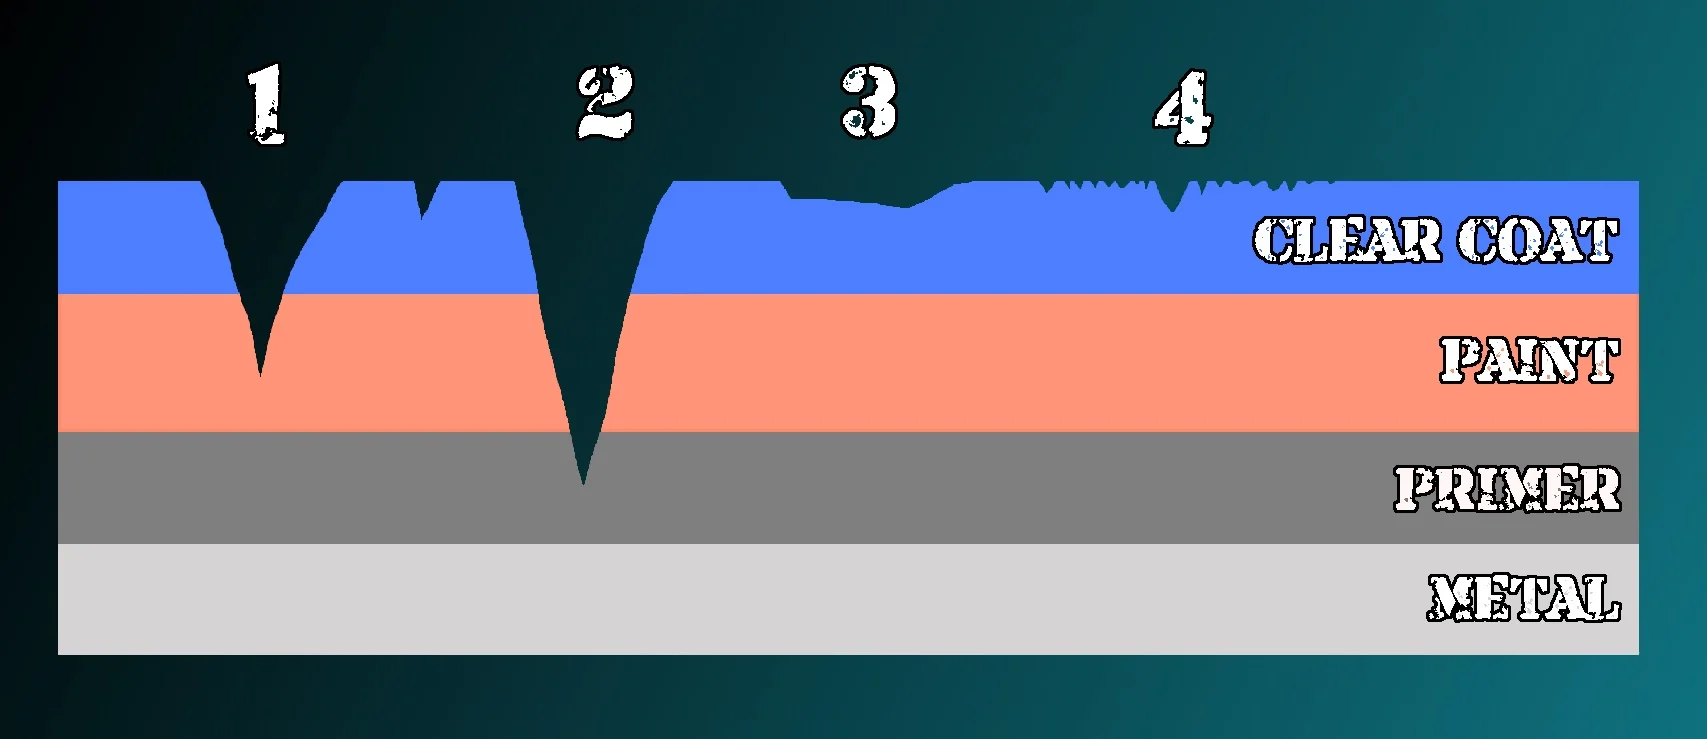
The primer, base coat, and clear coat represent a paint system. Different cars come with different configurations of paint systems. Each layer presented on the graph above is approximately 2 mils thick, or 50 microns. In other words, there’s really not much on there, no matter which layer of the paint system you’re looking at.
Being so thin, your paint is susceptible to all kinds of chemical and mechanical damage. Let’s take a look at the graph and go over each type of paint system damage.
- No.1 Moderate scratches – Moderate scratches have a wide range of causes. Anything from using inappropriate washing methods and auto car washes, to scraping snow off your car using thick brushes during the winter. These scratches can be corrected by removing a layer of clear coat from the car.
- No. 2 Deep scratches – Have you ever had someone key your car? If so, you’ve seen what a deep scratch looks like. These often go all the way to the bare metal as well, depending on the intensity of the contact. This type of damage can’t be corrected by polishing the clear coat as it goes way past the top layer and digs deep into the paint system. To correct deep scratches, you’ll need to fill the gap using the base coat and then apply a new layer of clear.
- No. 3 Chemical etching marks – Parking a car under a tree usually means dealing with tree sap and/or bird droppings. If left unchecked, both of these can eat through whatever layer of protection you have on your car, and start working through your clear coat. Bird droppings contain uric acid, which will expedite this process quite a bit. To avoid the type of damage seen on the graph, you should remove any bird droppings or tree sap from your car’s paint as soon as you spot them.
- No. 4 Light scratches – Light scratches are a perfectly normal result of car use. Anything that touches your paint can cause this type of light, shallow scratches.
How To Correct Car Paint?

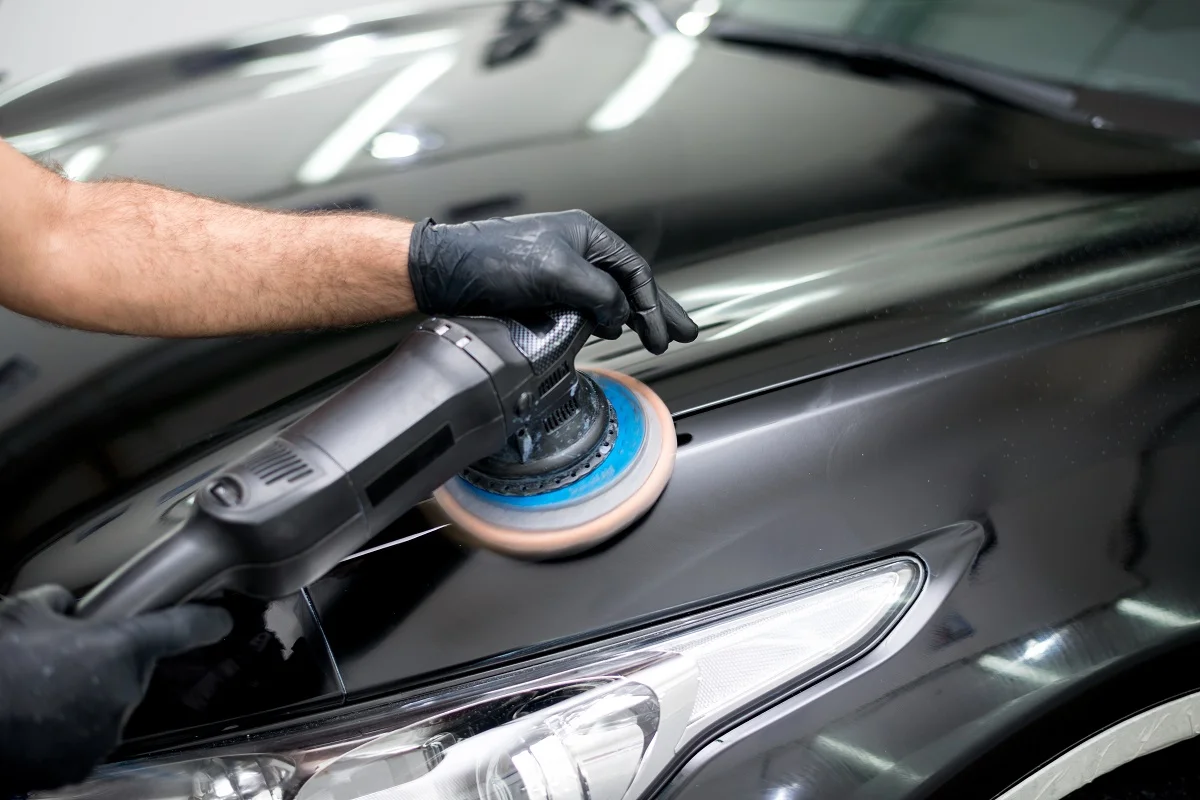
Car paint is corrected by polishing the paint using a polishing machine. Back in the day, everyone used a standard rotary polisher, however, these days dual action polishers are a much more common sight. More on those in the next chapter of this guide.
Polishers work by spinning a polishing pad over the paint, and mechanically removing a layer of the clear coat using a polishing compound as a medium. Aggressive compounds and pads are called cutting compounds/pads. Less aggressive ones are called polishing pads/compounds, and the least aggressive ones are called finishing pads/compounds.
The reason why there’s a whole spectrum of these tools is simple — you want to remove as little clear coat as you have to in order to achieve the wanted results. There’s only so much of clear coat on your car, and removing it will ultimately lead to oxidation, UV damage, and a whole array of other issues as seen on the image above.
Soft VS Hard Paint Systems
Since you want to remove the least amount of clear coat, the general rule of thumb is to start with the least aggressive pad/compound combo. If that doesn’t work, you go up a level. To make things even more complicated, different car manufacturers use different types of clear coat.
As a result, there are cars with soft clear coats and those with hard clear coats. For example, Japanese cars generally feature a soft clear that is very easy to remove and therefore very easy to burn through if you’re not careful. On the other hand, European cars have harder clear coats that often require the use of cutting pads/compounds.
Temperature Control
Using a rotary polisher, or a dual-action polisher is all about controlling the temperature of the panel you’re working on. More specifically, controlling the temperature of the pain that you’re correcting.
The moment you turn on a polisher and place that pad on a body panel of your car, you’re beginning to heat up the spot right underneath the pad. With rotary polishers, that spot would heat up fast, which is why you have to keep a rotary moving at a steady pace. If you don’t, there’s a good chance you’ll create a temperature spike that will burn the clear coat and potentially damage the rest of the paint system.
Dual-action polishers were invented to alleviate this issue by introducing an eccentric movement to the regular rotary design. Now, with a DA polisher, you’re getting that concentric rotation around a single axis, but also an eccentric movement that walks the pad left to right. As a result, you’re avoiding potentially damaging temperature spikes.
Burning through a clear coat with a DA polisher is extremely difficult, which is why this type of polisher is often recommended to beginners.
How Much Does Paint Correction Cost?
The answer to this question depends on what you’re trying to achieve and how far you’re willing to go. Tackling paint correction on your own means investing in tools, accessories, products, and at least one or more practice panels. The benefit of doing it on your own is that you can be as thorough as you want, all while learning a new skill.
If you decide to take your car to a pro, for a multi-stage paint correction, you could easily spend north of $1000 for a decent job.
Use the Right Products
Next time we’ll go over various tools and products necessary for correcting paint at home. With that said, you simply have to use quality products when you’re working with your car’s paintwork.
We prefer SONAX as our main choice for all things related to auto detailing. This brand has been in the business for a long time and is used by pros and enthusiasts alike. If you’d like to check out our selection of SONAX products, head over to our store and take a look at our vast catalog.

