

Clutches wear out over time. An average clutch on a manual will last you around 100,000 miles, and that’s implying that you granny-shift most of the time. Needless to say, it’s a job that awaits many owners of new (to them) used cars as well as those who bought their vehicles new and held on to them. That being said, clutch jobs are usually complex. SAAB 900 clutch job is an anomaly since it’s relatively easy to do, making it a great DIY project for those who like to fix their own cars. Today we’ll help you diagnose your clutch, get all the parts you’ll need, and finally replace the clutch itself!
SAAB 900 Clutch Explained
Swedish car manufacturers have always been at the very forefront of technological advances in the automotive industry. They’re the ones responsible for a majority of safety features all cars use today.
At the peak of Swedish automotive influence, buying a SAAB or a Volvo meant that you’re purchasing a quality car, made to last. One part of that pragmatic Swedish approach to building cars was simplified maintenance. SAAB 900’s clutch system is an excellent example of this.
Easy Access
Most cars have clutches between the engine and the transmission. Depending on how the engine is oriented (inline or traverse), this job can be complicated or slightly less complicated. Not SAAB 900, though.
SAAB 900 is a true outlier. Engineers over in Sweden had decided to go against the grain and build a clutch system mounted in the engine’s front. But wait, if the clutch is in the front, where’s the transmission?
The transmission on SAAB 900s is pretty interesting on its own. It’s mounted underneath the engine and actually serves as the oil pan for the motor. Such a layout works remarkably considering that SAAB 900 features an inline engine layout but is front-wheel drive.
As the engine spins, the power is sent through the flywheel to the clutch. It goes through a chain and sprocket system that drives the transmission below, ultimately transferring power to the output shafts.
Diagnosing SAAB 900 Clutch Issues
Despite the fact that SAAB 900 clutches are somewhat unique, they suffer from the same issues as any other clutch system when it wears out. Here’s a quick rundown of the most common issues.
Engine Revs but the Car Isn’t Accelerating
As the friction disc wears out, it loses most of its ability to grab onto the flywheel. The result is a clutch that keeps slipping every time you apply the gas. The onset of clutch slippage is usually gradual in nature.
You’ll initially feel the car slipping while going up the hill or under aggressive acceleration. To quickly check if your friction disc is worn out, take a drive on a nearby highway, get the car up to speed, put it in a higher gear, and start accelerating. If your clutch is worn out, you’ll notice.
Pedal Goes to the Floor and Stays There
This one is often attributed to a loss of hydraulic pressure. In other words, one of your clutch cylinders (either the master cylinder or the slave cylinder) has a leak, or you have a busted line. Your clutch cylinders have hydraulic seals that keep the hydraulic fluid inside and allow the cylinder to build up pressure.
Once they fail, the fluid no longer operates in a closed system and can now escape. To fix this problem, you’ll need to either replace the affected clutch cylinders or rebuild them.
How to Replace the Clutch on a SAAB 900?
Before we get to the clutch replacement procedure, let’s lay out the parts we’ll need for this job:
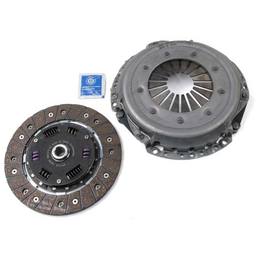
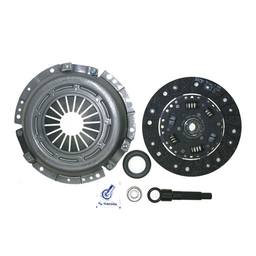
- Clutch Kit
- Master Cylinder Rebuild Kit (Optional)
- Pilot bearing (Optional)
Everything you’ll need will arrive with the clutch kit, although you might have to get the pilot bearing separately. We strongly suggest only using clutch kits from renowned brands such as SACHS. This is one part of the car that you don’t want to cheap out on.
In case you have a master cylinder failure, you’ll also need to get the master cylinder rebuild kit. It’s pretty cheap and features all the seals and other pieces you’ll need for the job. With all that said, let’s get down to business.
Step 1 – Clear the Way to the Clutch
To do this, you’ll need to disconnect the battery, remove the intercooler along with the hoses. Next, remove the left radiator fan and then remove the small plastic cover.
Step 2 – Prep the Clutch
At this point, have someone sit in the car and press the clutch pedal while you install the pressure plate spacer ring. Although easy to reach, there really isn’t much space to work with.
If you don’t compress the pressure plate, you simply won’t be able to pull it out. In case your hydraulic pressure is already gone, your best bet is to use a set of nuts to compress the plate.

Step 3 – Remove the Clutch Input Shaft
Next, we’ll need to remove the clutch input shaft. To do this, you’ll need to remove the retention pin and the plastic cover that sits right behind the transmission drive area, facing the radiator.
Once the cover is off, you’ll notice a small plastic bolt. Remove it and insert a similarly threaded metal bolt, threading it in so that a part of the head is sticking out. Next, use a pry bar to pry the bolt and the clutch input shaft out.
OPTIONAL Step – Drain the System
If you’re planning on replacing the master or slave cylinders, you’ll need to drain the system first. Attach a plastic hose to the bleeder valve on the slave cylinder and loosen it to start the bleeding process. Make sure to use a big enough container to drain the fluid.
Step 4 – Remove the Old Clutch
To remove the clutch, you’ll need to unbolt the slave cylinder, which is held in place by three small bolts. Then, remove the bolts that hold the pressure plate to the flywheel. With those off, you can start removing the slave cylinder, pressure plate, and friction disc.
First, you’ll need to work the pressure plate, prying it off the three dowel pins. You’ll have to rotate the flywheel to pry it off. To spin the flywheel, put the car in neutral and then use a pry bar to push down the flywheel teeth.
OPTIONAL Step: Replace the Pilot Bearing
With the old clutch off the flywheel, you can use this opportunity to replace the pilot bearing. We recommend doing this as proactive maintenance since you’ve already in there.
OPTIONAL Step: Replace the Master Cylinder
If you’ve depressurized the system earlier, you can remove the master cylinder. Start by disconnecting the metal clutch line closer to the engine and the vacuum hose that runs to the reservoir.
Next, get inside the car, remove the interior kick panel, remove the two mounting nuts and the locking pin that connects the cylinder to the clutch pedal. The cylinder should slide right out. To reinstall the rebuilt or new master cylinder, simply follow these previous steps in reverse.
Step 5 – Insert the New Clutch
One cool trick is to zip tie the new pressure plate, friction disc, and slave cylinder together and wiggle them into place. Since there’s really not much room between the transmission drive housing and the flywheel, you better arm yourself with patience. You can make some extra room by yanking the three dowel pins from the flywheel before inserting the pressure plate.
Step 6 – Insert the Pressure Plate Bolts and Input Shaft
Next, insert the pressure plate mounting bolts and have them hand tight. Then, reinstall the clutch input shaft and install the plastic bolt. Once that’s in, install the plastic cap back on and install the metal safety pin. Next, reinstall the dowel pins and tap them back in place if you’ve removed them in the previous step.

Step 7 – Cut the Zip Ties
With everything sitting where it needs to sit, cut the zip ties, and tighten the pressure plate bolts as necessary.
Step 8 – Remove the Spacer Ring
To finish the installation, remove the spacer ring. However, make sure that you don’t press the pedal at any moment before you remove the spacer ring. Doing so will damage your slave cylinder.
Step 9 – Bleed the Clutch
One of the last steps in this process is also one of the most important ones – bleeding the clutch system. We suggest using the reverse bleed method.
- Take a 3ft clear hose and connect it to the bleeder valve on the slave cylinder
- Open the bleeder valve as well as the reservoir cap
- Push fresh fluid through the hydraulic system by filling up the clear hose with new fluid and forcing it up using a bicycle pump (or a syringe)
- Add more fluid until you see the clear fluid and no more bubbles in the reservoir
- Once done, close the bleeder valve and pack the used fluid for disposal
Step 10 – Reassemble the Car
Lastly, reassemble the clutch cover, radiator fan, and install the intercooler and its hoses back in place.
Get Quality Clutch Kits
What you put in your car will define how long you’ll have before something breaks again. It’s always better to use only OEM and Genuine parts when it comes to critical systems — clutch and transmission included.
To find quality clutch kits, bearings, and clutch cylinders for your SAAB 900, simply head over to our online store and find your car in our navigation tool. Our system will give you a list of parts and components that match your car.


Not too sure about using a bicycle pump to push fluid back through. You have not mentioned where the fresh fluid comes from. Are you suggesting putting the fresh fluid inside the pump?
Good catch, mkp. To do the reverse bleed method, you connect a section (around 3 feet) of clear plastic tubing to the clutch slave cylinder bleeder nipple and open the bleeder. Then fill the clear tube (not the pump itself) with fresh fluid before connecting the bicycle pump and pumping the fresh fluid into the system from the bottom up. I have also seen people use a automotive vacuum pump to pull fluid from the top up (or alternatively a hand pump to push it through from the top), but that usually involves modifying a spare reservoir cap.
I have heard of a method for bleeding the clutch system by using the brake system as a pump. Connect a tube from front brake calliper bleeder nipple to the slave cylinder bleeder nipple. Pump fluid from the brake master cylinder into the clutch system to reverse bleed it.
Now that’s a new one!