

Modern automotive suspension systems are fairly complex compared to their predecessors. Automotive engineers have achieved a great deal of efficiency by improving materials and component designs. Still, there’s a decent amount of expendable suspension parts on an average car, including ball joints. Join us as we discuss how to check ball joints on your car, how to tell if yours are about to fail, and how to replace them without replacing the entire control arm (on vehicles where this applies).
What is a Ball Joint?
We usually imagine cars in two dimensions. They either go forward/backward or left/right. While that might be true, each wheel travels in the Y-axis as well, placing a lot of strain on the suspension system. One way to alleviate some of that strain was to use free-moving joints to allow wheels to move in all three dimensions.
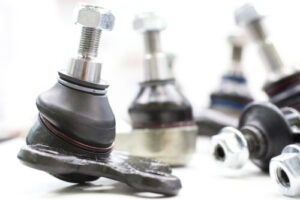
An average ball joint features a ball with a stud on top that sits inside a cup. The space between the cup and the ball itself is lubricated to keep friction and bay and allow the ball to move freely. This entire little system is enclosed in a protective booth designed to keep the debris away from the joint.
These joints are found on sway bar links and other suspension components, but their most popular application is on control arms. Most modern vehicles use ball joints to connect the control arm to the steering knuckle. Since there are usually lower and upper control arms per each of the front wheels, you usually find two ball joints per side – upper and lower ball joint.
What Causes Ball Joints to Fail
As far as ball joints go, it’s not a matter of if they will fail, rather when they will fail. This component is meant to last only so long before it’s destroyed by bumps, potholes, or simply age. Here’s the thing with ball joints – they only last as long as the rubber/plastic booth that protects them.
Once that protective layer of plastic is compromised, you’ll see an ingress of dirt and debris into the joint. Once dirt, water, and gunk enter the space between the joint and the cup it sits in, there’s going to be friction.
At that point, it doesn’t take long for a ball joint to go bad. A worn-out ball joint can cause mild issues such as various noises as you drive, go over speed bumps, turn, etc. That being said, ignore a worn ball joint for too long, and you might just find your wheel going one way while your vehicle goes the other. This was a major issue on W124 E-Class Mercedes-Benz back in the day.
How to Check a Bad Ball Joint?
Several signs will indicate your ball joints need replacing. Checking them for wear is a great way to stay ahead of any severe issues. Luckily for everyone, there are several ways you can do this. Let’s start with the easiest ones.
Diagnosing a Worn Ball Joint by Driving
If you commute to work every day, you can do a simple ball joint test on your way to work. Bonus points if you’ve got a speed bump or two along your route. One of the first indicators of a worn ball joint is the vibrations. As the joint wears out, it no longer has that lubrication layer between the cup and the ball. Not only that, but the rubber booth it sits in is also no longer in one piece.
As a result, the joint will start channeling vibrations from your steering knuckle to your steering wheel. These vibrations occur when you turn the steering wheel, but also when you drive over any slight bumps in the road.
The Speed Bump Test
Driving over speed bumps is a great way to check your ball joints. You’ll want to go as slow as possible and listen for any noises coming from the front end of your vehicle. You’re looking for clunking noises that would indicate a free-floating ball joint, squealing noises that usually indicate a ball joint in the early stages of failure.
The longer you ignore the issue, the worse these noises will get. It’s a good practice to roll your windows down and wait for any other vehicles to pass before you start driving over speed bumps. Also, drive over a speed bump several times if necessary.
Hands-On Test
If driving the vehicle had shown no issues, but you still suspect that something is off, it’s time to get your hands dirty. For this test, you’ll need a carjack. Jack the vehicle up in the air, either in the front so that both front wheels are off the ground or one wheel at a time.
Once the wheels are in the air, place your hands at the 12 o’clock and 6 o’clock positions on the wheel. Next, push with one hand while pulling with the other, and alternate. Rocking the wheel back and forth should reveal zero play. Do the same at 3 o’clock and 9 o’clock positions to check the bushings and other suspension components while you’re at it.
In case there is any play at the top of the wheel, that’s an indicator that the upper ball joint is ready for replacement. Likewise, movement in the lower part of the wheel indicates lower ball joint issues.
Visual Inspection
Last but not least, you can always use the Mk1 Eyeball to inspect your ball joints. Jack the vehicle off the ground, remove the front wheels and take a look at each pair of ball joints. What you’re looking for are any signs of damage to the booth. Usually, you’ll find a cracked booth that’s showing a lubricant leak somewhere along its edges.
If you have a pry bar at your side, stick it between the ball joint and the controls and give it a good wiggle. If there’s too much play, the joint is toast.

Replacing Press-In Ball Joints
Most modern vehicles come with press-in ball joints on the control arms. The issue here is that most manufacturers recommend replacing the entire control arm when the ball joint goes belly up. Control arms aren’t cheap, so it pays to remove the ball joint itself.
To do this, you might need to resort to violence. If we take BMW E30’s control arm as an example, they’ve purposely made the ball joint unserviceable. To remove it, you’ll need to cut into the joint’s flange portion with a grinder wheel, creating an X and then prying the pieces off.
Now you can put the control arm in a vice and use a press to press out the ball joint. Ensure that the press is perpendicular to the control arm both when removing the old ball joint and installing the new one. Any misalignment in this part of the process can seriously reduce the range of motion of the said joint.
Although it’s not easy, DIYing a control arm repair can save you a lot of money, especially if you have a project car you’re tossing around the track.
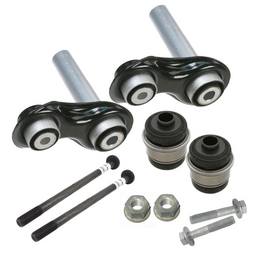
Use Only Quality Components
The last bit of wisdom we’d like to pass on is only to use quality ball joints. Brands such as Sidem and others will give you plenty of choices regarding durable, reliable, and most importantly, quality made parts. Check out our catalog to find out which ball joints match your vehicle.

