
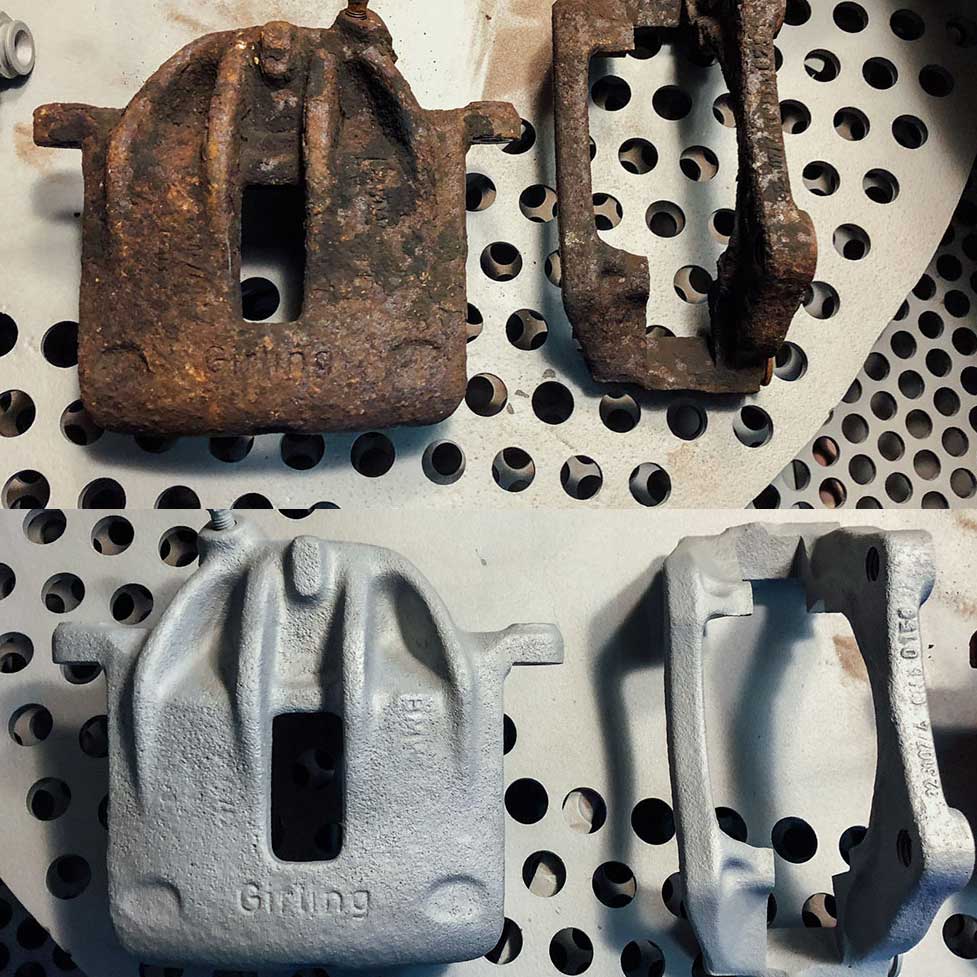
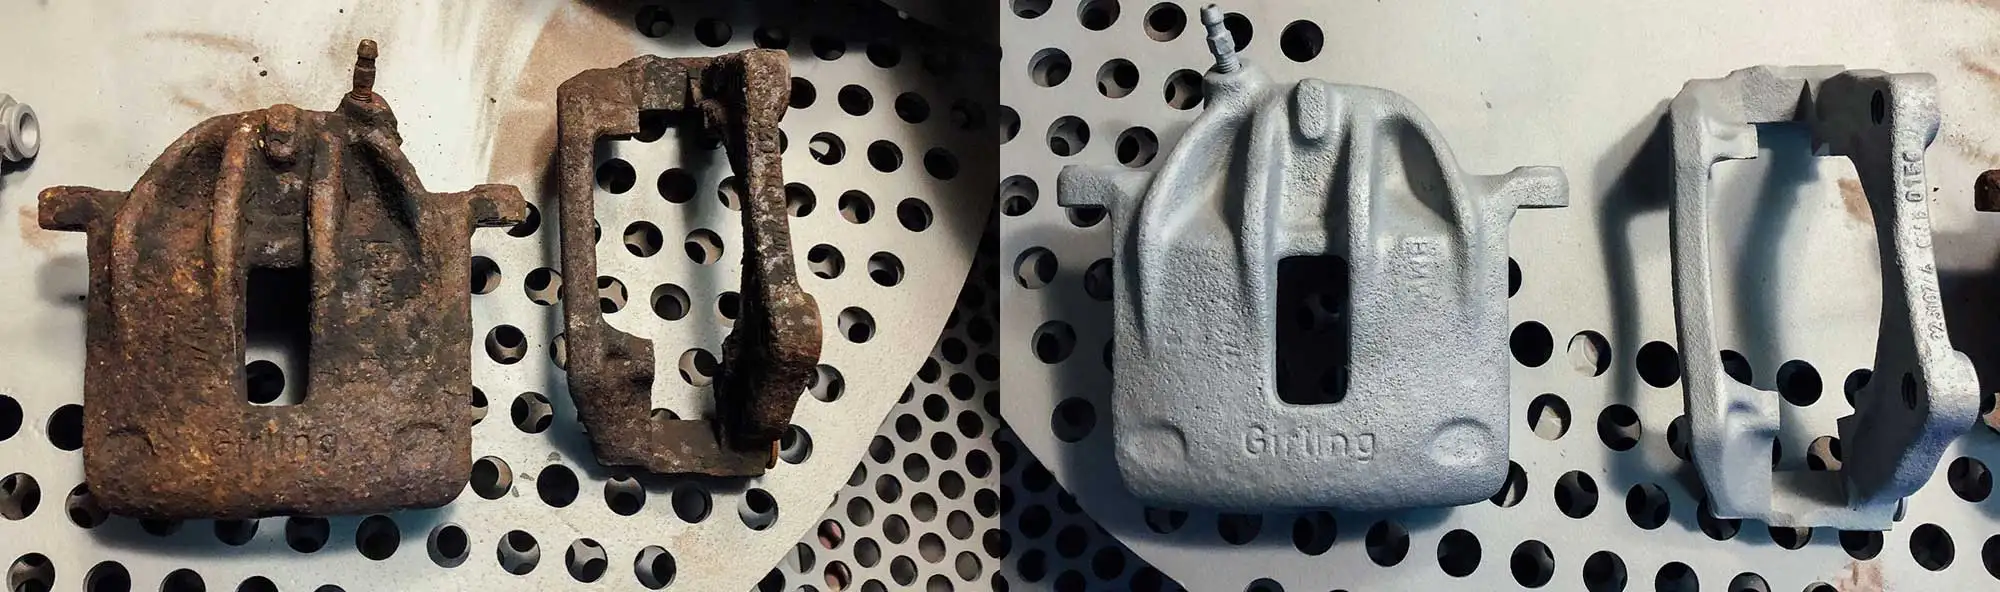
Rusty brake calipers are a byproduct of time, plain and simple. Endless cycles of rain, sun, dry and wet conditions, cold and hot weather are guaranteed to leave a mark. A rusty set of calipers won’t affect your braking performance too much as long as the rust is superficial. All of the important bits are well protected and relatively safe inside the caliper itself.
However, no one likes to look at the rust on their cars, even if it’s hiding behind alloy rims. Today we’ll show you how you can restore your calipers to brand new condition at home. We’ll use a BMW E30 as our guinea pig, but this process pretty much applies to all calipers out there.
Why Rebuilding Brake Calipers Makes Sense?
Brake discs and calipers are often hidden behind massive rims, out of sight and out of mind. However, the moment you decide to put larger alloys on your car, whatever horror was hiding behind your factory wheels will now be visible for the whole world to see. If you own an older car, there’s a solid chance that your calipers are on the rusty side of the spectrum.
Big Brake Kits?
If this bothers you like we think it does, you have two options – you can either rebuild your existing calipers, or you can opt-out to get a big brake kit.
You’d think that going for the latter is the default right choice, but that is not always the case. Big brake kits aren’t necessarily the best choice for your particular car or application.
On top of that, big brake kits can put a few holes in your wallet very easily. In 90% of the cases, rebuilding your factory calipers is the optimal way to go both in terms of performance and aesthetics. Not to mention that you’re staying within the factory specs for your car.
Preparing the Tools, Parts, and Materials for the Job
A full brake caliper rebuild is much more than just getting rid of rust and slapping a new coat of paint on that bad boy. You’re tearing the entire caliper apart, which means that you’ll be replacing a bunch of rubber components.
In case of our E30 here, we’ll need the following: one front and one rear brake caliper repair kit, a guide repair kit, guide bushing set, and finally a set of bleeder screws. Keep in mind that E30s are very popular cars with loads of aftermarket support, so finding these repair kits isn’t a problem.
We offer a wide range of caliper rebuild and repair kits for other makes and models as well. If you’re interested in finding one for your car, use our navigation tool or contact our reps. Our team is always on standby to answer any questions you might have!
As far as tools go, you will need a socket wrench, a screwdriver, a hammer if things are seized up, and a pair of gloves. Later, we’ll discuss different means of removing the rust and the tools you might need for that part of the process.
Step 1 – Remove the Brake Caliper
This is pretty straightforward. Remove your wheel and follow your car’s repair manual on how to remove the brake caliper. While you’re here, it’s worth mentioning that this is an excellent opportunity to swap your rotors, brake pads, and flush your brake fluid. After all, it’s not every day that you get to disassemble your brakes.

Step 2 – Pulling Everything Apart
If your calipers look like the one on the pic above, there’s a solid chance that things won’t come apart easily. Arm yourself up with a rubber mallet, screwdrivers, socket wrenches, and a lot of patience. As you reduce the caliper to its basic components, start removing all of the rubber seals and guide bushings.
Once you get them all out and lay them out flat on the table, you’ll understand why everyone insists on installing new ones. After years of exploitation, these rubber components have entirely lost their ability to produce a positive seal.
Step 3 – Inspect the Piston for Damage
If everything went right, at this point, you’re left with the steel shell of a caliper sitting on your table. Use this opportunity to take a good look at the piston you’ve just pulled out of the caliper. You’re looking for rust spots and overall degradation of the piston.
Even though pistons are usually protected by the dust covers and rubber seals, there’s always a small chance that brake dust, water, and other contaminants end up between the piston and the cylinder wall. Constant friction caused by such debris will eat away at a piston over time.
Fix or Find a Used One in Good Condition
If your pistons are damaged, you’ve just found yourself between a rock and a hard place. Finding a brand new piston is borderline impossible for some car models. Instead, you’ll either have to start visiting your local salvage yards, or you can send the piston to be repaired by a machine shop.
Either way, don’t put a faulty piston back into the caliper once you’ve rebuilt it.
Step 4 – Getting the Rust Off
Now comes the part we’ve all been waiting for – getting rid of that ugly rust. There are two ways you can approach this task. One is easy, and one not so much. However, both will give you decent results that present enough effort.
If you have access to a sanding machine, we strongly suggest you use that. Not only will it save you a whole bunch of elbow grease, but it will also produce a much cleaner result.
The other, less speedy and much more painful option is to get yourself a wire brush or two and go to work. It will take more time, but you can quickly get the desired level of rust removal this way.

Step 5 – Prepping the Caliper for the Paint Booth
Next up, you’ll want to get a can of compressed air or a compressor and blow the calipers clean of any dust or other debris. Clean each piece individually and make sure that there’s nothing left on there that would interfere with laying down the primer coating.
Once you’re sure your caliper is all nice and clean, plug off every hole using tape or whatever you got at hand. Honestly, earplugs work wonders if you can get some.

Step 6 – Painting the Calipers
With the calipers ready for painting, you can start spraying the primer. Use three coats of primer with plenty of time for each coat to dry off. Now comes the part where you chose the color you want your calipers to be in. Some people like a solid black coat of paint while others have a thing for a flashy, borderline neon shade of green. It’s your call; we won’t judge.
Applying three coats of paint and then three coats of clear should get everything sealed up nicely and looking darn pretty.
Step 7 – Reassembly and Installation
All you’re left to do now is put the caliper back together, making sure that all of the parts fit nicely. Applying a bit of brake fluid around the piston and on the seals should make the whole process go smoothly as well. Slap a pair of new Brembo pads, and you’ve got yourself a wholly rebuilt brake caliper that looks awesome and performs excellently.
Just make sure to use new brake fluid per your car’s specifications.

Summary
Rebuilding a brake caliper takes a little bit of work, but it’s absolutely a viable DIY project. Whether you decide to outsource rust removal and spray painting is up to you. There are many ways to get the job done. Check our online store for rebuild kits for your car and spend a weekend making your ride pretty. After all, it’s about the journey itself as much as it is about the destination!


What about the condition of the piston and the bore of the caliper? did you clean and hone these? I’d expect the piston and bore surface were rusty or scored if the calipers were so old, neglected. Any moisture in the brake fluid will give you corrosion, and the piston dragging a less than perfect surface over the new seal will wear out the seal.
Curious, did you hone the bore? clean the piston surface? use a new piston?
Hey John,
The pistons were actually in good condition, so I didn’t do anything to them. The only part that was a little rough was the exposed portion that goes against the caliper, so I just cleaned that up slightly with a file to make sure it was nice and flat. But I left the inner part of the piston alone since it looked good.
Does that answer your question?