
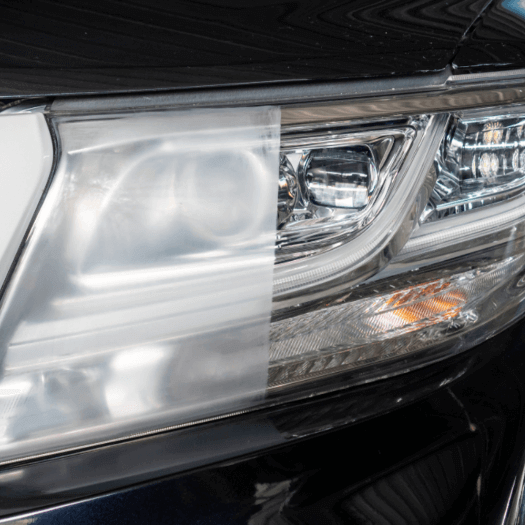
Headlights play a significant part in the appearance of a car. They’re such a massive aesthetic feature on some models such as the Porsche 911 series that they’re considered a defining design detail. With that said, when headlights go from new, bright and shiny to weathered and cloudy, a lot of the appeal they bring goes along with them. Headlight restoration is easily one of the fastest ways to give your car a fresh look, and today we’ll show you how to do it at home. We’ll be using what we feel is one of the best headlight restoration kits out there to get the job done. Let’s jump right in!
Why do Headlights Turn Cloudy?
Not all headlights are created equal, but all of them will deteriorate over time, that’s a fact. The causes are many, but it generally comes down to the environmental effects such as UV exposure, oxidation, wind abrasion, and similar. It’s not something that happens overnight, but given enough time, any light out there will start to deteriorate.
All of this is even more apparent in acrylic headlights. This type of light is much more susceptible to UV radiation as the protective coating applied in the factory tends to wear off fairly quickly.
Wind abrasion is a big one as well. As you drive, all kinds of debris are constantly slamming against your car’s front end and grille, most of it tiny. Over time that abrasion damages the fairly soft surface of an acrylic light, leaving behind a landscape of microscopic craters that give you the foggy and cloudy look.
Is Headlight Restoration Worth It?
Most people, us included, are irked by the foggy headlights. Once they lose their clarity, the whole car gets that worn look to it. However, aesthetics is not the only reason why restoration is worth doing. What most drivers overlook is the brightness of the headlamp itself at night.
As it turns out, all that abrasion and oxidation isn’t only bringing down the looks of your car, but it’s also making your headlamps less efficient at night! If you’re wondering how bad things can get, we’ll say that some headlights can lose up to 50% of their efficiency due to deterioration.
That’s 50% dimmer illumination of the road ahead of you at night. You’ll probably agree that’s a significant number. To answer the question from the title – yes, it’s absolutely worth restoring your headlamps.
Choosing the Best Headlight Restoration Kits in 2020 – What works?
Headlight restoration is one of the most common DIY jobs out there. There’s a whole bunch of products and kits in the aftermarket segment. Finding one is not an issue, but finding the right one might be. We’ve chosen to go with the SONAX headlight restoration kit for this guide.
We’ve chosen the SONAX kit because it offers proven results in terms of quality. The kit contains several components, all of which play their role in the whole process. With SONAX, there are four steps to follow to get the results you want.
DIY Headlight Restoration Guide
Restoring the headlamps to their original or near-original state used to be a difficult job back in the day. That’s no longer the case. With new products and restoration methods, it takes an hour or so to do both headlights. Here’s what you have to do:
Step 1 – Preparing the Headlights
Before you even break the seal on your SONAX kit, there are a few things we need to do first. To start things off, break out your car washing gear as those headlamps require a good scrubbing. You’ll want to make them as clean and clear as possible, removing all of the debris, caked up insects, and whatever else you got stuck on there at the moment. Doing this part right is absolutely imperative for everything that comes next.
Once both headlamps are properly decontaminated, clean, and dry, it’s time to mask anything you don’t want to damage. Headlight restoration is still very much dependent on mechanical abrasion so there’s always a chance that you might nick a panel or two if you’re not careful. Get some painter’s tape and mask off any bodywork that is near the headlamps. You can simplify this step a little by popping the hood.
If you’re happy with your masking job, it’s time to get started.

Step 2 – Rough Sanding
The SONAX kit that we’re using comes with a sanding disc. Packed into a little cylinder that’s easy to grip and allows you have full control over the amount of pressure you’re exerting on the headlight. Speaking of pressure, there’s no need to white knuckle anything.
The abrasive surface of the sanding disc will get even out most of the irregularities on the headlamp’s surface with light to medium pressure. However, it will take a bit of elbow grease. One thing to keep in mind is that this is a wet sanding process. In other words, you’ll need to keep the disc lubricated at all times.
What this translates to is having a spray bottle full of water that you’ll apply to the headlamp after every other pass or so. The water is there to prevent the disc from being oversaturated with residue, which will severely diminish its ability to do its job.
Don’t expect to regain full clarity at this point in the process. Remember, this is rough sanding. What we’re doing now is removing the roughest layers. We’ll get that fine, bright shine later on. Once you’re satisfied with how your headlights are looking so far, it’s time to move on to the next step.
Step 3 – Fine Polishing
Next up, we’ll take the applicator pad that comes with the kit and the polishing compound. We’ll apply a dab of paste onto the applicator pad and slowly start working it into the headlight. Try not to apply too much paste at any given moment. Doing so will leave you with too much compound to work with, thus oversaturating your work area. Apply small amounts and add more when necessary.
Fine polishing is part of the process where you’re drawing out the factory shine. The more time you spend polishing the headlamps, the better result you’ll get. We suggest that you take your time and keep at it until the headlamps look like new or nearly new. Once again, elbow grease is key here.
When you reach the point where you’re satisfied with how everything looks, take a towel and wipe the headlights clean. It’s important to remove any residual sanding compound because we need a clean and clear surface for our next step.

Step 4 – Long-Lasting Protection
Restoring the headlights won’t do you much good if you don’t protect them against the environmental effects. That is precisely what we’re doing in the last step of this DIY job. SONAX ships their kit with a sealed plastic pouch that contains a towel soaked in protective ceramic coating. Take a towel out of its packaging and start working the ceramic coating into the headlamp. Make sure to cover every part of the headlamp and be liberal in terms of pressure. It’s essential to work this stuff in properly.
After you’re done, park the car in a garage and let it sit for about an hour or so. The ceramic coating, just like SONAX standalone ceramic coating kit, needs some time to dry and set properly. Once an hour is up, you’re more or less good to go. If you can, leave it be for 2 hours just to make sure.
How Long Will This Protection Last?
Your newly protected headlights are set for a long time. We can’t really give you a specific timeframe as it depends on a variety of factors, but if everything’s done right, you’re looking at years at the very least. There are also ways you can keep the oxidation at bay.
- Keep the Headlights Clean – For starters, make sure to wash your headlights when you wash the car. You’d be amazed how many people simply skip over their headlights for no particular reason. Pay a few extra moments of attention to them, and you’ll help keep them protected for longer.
- Stay Out of the Sun – Just like UV rays are not all that great for your skin, they’re not great for your headlights either. Try to park the car so that the headlights are in the shade. This can be not easy depending on where you live, but a little bit of effort goes a long way. Parking a bit further from where you need to go will most likely reveal a few good spots in the shade.
Where to Get SONAX Headlight Restoration Kit?
If you’re interested in getting the SONAX headlight restoration kit, head over to our online store. We carry many SONAX products, including the kit we’ve based our guide on. Feel free to contact us if you have any questions about the kit or any of the SONAX products. Our customer reps are standing by to answer any question you might have!


Nice. Small issue tho How Come the side lites Do Not need ‘restoring”? And how long before the patched lenses need redoing. IF theyt will how many times can it be done before the ploycarbonate plastic is desytroyed ?
Hi Dan, the cause of the roughness and haze is wind abrasion. The side markers are not in the direct line of wind that burns the UV coating off the headlights. I assume the side lights also lack the UV coating, perhaps making them less prone to the wind erosion. That I can’t verify though. Because of the process (sanding smooth and then polishing), I can only assume that you can repeat the process until you sand through the lens! I recommend instead using a lamin-x kit to protect the lens so you will never have to restore them again.
Nice article – good basic step-by-step instructions. I think this may help us with our XC70, but our second vehicle, which has horribly cloudy headlights, also has tiny cracks that are letting some moisture inside. Now I am sure 2/3 of the issue is basic lens clouding (the car is a 2000 Celica GT-S), but I wonder if the intense wet polishing while helping buff out the haze would also “inject” too much moisture via the cracks. I want to replace the entire lens assembly, but can’t justify a few hundred dollars when the all of the lights still work, just not at peak efficiency. So, what’s your take?
Thanks.
Troy Sanders — customer for our 1999 V70R (gone) & current 2007 XC70
Thanks for the compliment! I would not be concerned with the cracks letting moisture in through the wet sanding. Simply driving through the rain will be as detrimental, if not more so, than this restoration process. Because the kit is so cheap, I say give it a try (it may even remove some of the surface cracks through the sanding). However if the interior of the lens is fogged up, the restoration will only do so much. In that case, I suggest buying a used light that doesn’t have interior fogging. Even if the outside of the used light is clouded, you can still restore that to a crystal clear finish. I will be doing a DIY on the Lamin-x protection install soon so keep an eye out for that.
I had no idea that I could use 3m to help my headlights look brighter. It would be so nice to do this soon, because my headlights have been incredibly dim for months. It can make it really difficult to drive at night, so I would love to start working on this project. It sounds like first I will need to get a few tools to help me be able to scrub off the lens and then put on the 3m. Thank you for this great tutorial!
You’re welcome Grant. The only tools you will need are a 3M Headlight Restoration kit and a set of Lamin-x Protective films to maintain the clarity of your freshly restored headlights. Your night driving experience will be much safer and more enjoyable from then on. The whole process can be done in a few hours.