

Car upgrades and mods are a fun way to immerse yourself into the world of brokenness, but also fall in love with your car over and over again.. There’s nothing better for gearheads than spending absorbent amounts of money only to squeeze a bit more power out of your car. However, polyurethane or urethane bushings, show that not all upgrades, especially suspension related ones, need to be expensive to make a difference. These bushings actually offer a decent boost in performance, considering how much they cost. Today we’ll get you familiarized with the concept of polyurethane bushings and show you how to install them on a SAAB 900!
Urethane Bushings VS OEM – What’s the Difference?
Bushings can change the way your car handles and feels. However, choosing whether you’ll go with OEM or urethane bushings is a personal choice. This isn’t a matter of which ones are better. There are areas where rubber OEM bushings do better and areas where urethane ones do much better. You need to figure out what you want out of your car and make a decision accordingly.
That being said, here’s what you get with urethane bushings:
- Improved Durability – One of the main cons to OEM rubber bushings is the fact that they don’t last too long, thus compromising your suspension. Rubber tends to wear out over time, becoming brittle and cracking all over the place. With urethane bushings, you don’t have this problem. Polyurethane is a durable material that can take the beating of constant heat/cold cycles, load shifting, and more. A set of urethane bushings should last the lifetime of a vehicle.
- Better Driving Experience – A set of urethane bushings will improve the overall driving feel of your car. By removing the softness of rubber bushings in the suspension, you’re getting a more direct connection to the road. Keep in mind that a more direct connection with the road often means less comfort overall. That’s why you need to make an informed decision before going polyurethane.
- Easy to install – Urethane suspension bushings are easy to install in a DIY setting. Standard rubber bushings can also be installed at home, but you’ll have to use specialized tools. With urethane aftermarket bushings, there’s nothing to press in or out in most cases (not the case on SAAB 900). We’ll talk more about this in the installation guide later on.
Urethane Has Its Flaws, Too
There’s a good reason why cars come with rubber bushings from the factory. Although the rubber doesn’t make the car handle more directly, it does offer comfort. When you replace rubber with polyurethane, or god forbid, solid aluminum bushings, you’re essentially allowing most of the vibrations from your suspension to reach the passenger cabin.
Said vibrations would otherwise be soaked up by the rubber bushing itself. That’s one reason why some drivers ultimately go back to rubber for no other reason than comfort. Again, make sure that you’re going into this swap with all the necessary information at hand. It’s not too big of a deal if you decide to default back to rubber, but you’ll have to dismantle your suspension again.
Another thing to keep in mind about polyurethane bushings is the fact that there’s maintenance involved. That’s right, and your bushings need maintenance.
Here’s the deal – urethane bushings are not welded to the mating surface like regular rubber bushings are. Instead, they are mechanically kept in place. The whole outer perimeter of the bushing is under constant friction with the shell it’s sitting in.
So, to allow the bushing to work properly, you’ll need to grease it up before installation. Then, every several years, up to 5 in some cases, you need to get in there again and add more grease. In short, urethane bushing isn’t something you can just install and forget.
How to Install Urethane Bushings on a SAAB 900 Front Sway Bar
Speaking of installation, join us as we give the suspension on this SAAB 900 an upgrade. As most of you probably know, SAAB is long gone. The last generation GM era cars are fine for the most part (depending on whom you talk to), but they’re definitely not the ones SAAB fans are longing for.
It’s the SAAB 900 series, and the models that came fore it that truly encapsulate what this brand was all about. Anyway, no matter how awesome these cares are, they’re getting up there in terms of mileage.
Performing a bushings upgrade isn’t so much a matter of preference, but a necessity. This particular SAAB 900 will get a set of polyurethane bushings on the front sway bar, and we’ll walk you through the process.
Step 1 – Remove the Sway Bar
The front sway bar on a SAAB 900 is held in place by four rubber bushings. To remove it, you’ll need to remove the two bolts that are securing it to the car’s body. These are located behind the steering rack. You can’t miss them. The other two bolts are located at each end of the bar.
Step 2 – Remove the Old Bushings
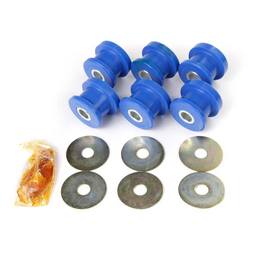
Here’s where things get a bit tricky. As we’ve said before, polyurethane bushings arrive as two separate pieces. However, they don’t come with metal housing of their own. Instead, you’ll need to reuse the old bushings’ housing, which means squeezing the rubber bushings out.
You’ll either need a specialized tool to get this done or a vice. First, cut the rubber bushing out. It’s probably easiest to just dig it out with a knife or make an incision on the inside of the bushings, thus splitting it open. Either will do. Keep in mind that some bushings can put a fight, depending on how old and stiff they are. Arm yourself with patience and be ready.
Step 3 – Insert the New Polyurethane Bushings
Inserting the new bushings is fairly straightforward. You will need a vice for this part. Also, you’ll need some silicone spray or alternative lubricants. Apply the silicone spray to the inside of the metal shell and the outside of the bushing.
Alight the bushing the best, and you can start working it into the shell by hand. All you need is for it to bite, and then you can drive the rest of the way home using a mallet or a hammer. Just make sure it’s a rubber mallet; otherwise, you’re risking damaging the bushing or the metal housing it is sitting in.
Step 4 – Clean up the Bar and Put It Back
Once you’re done installing your brand-new bushings, reinstall the bar back on the car using adequate torque specs, and you’re good to go. Although this process revolves around a SAAB 900, the philosophy is more or less the same on most other cars.
Where to Find Quality Polyurethane Bushings for Your Suspension?
eEuroparts currently offers a selection of bushings for a variety of European makes and models. We joined forces with the companies such as MTC, Proparts Hi-Performance, and others to bring you a balanced selection of products within the polyurethane range.
If you’d like to know which of these best fit your vehicle, simply head over to our online store and input your car’s data into our search tool. Once our software is done crunching the data, you’ll get a complete list of parts that match your vehicle.
If you have any issues or questions, feel free to get in touch with our customer support. You can reach us via email or phone, and we’ll try to answer all the questions you might have.

